Forms
Most of DroneDeploy's components follow Material Design guidelines.
Input Fields
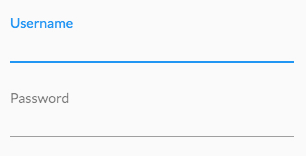
The .input-field allow users to input data. The bottom border of the input field should light up on focus with our blue brand color, hex: #2196F3.

<div class="row">
  <div class="input-field col-4">
    <input type="text" class="validate">
    <label for="first_name">Username</label>
  </div>
</div>
<div class="row">
  <div class="input-field col-4">
    <input type="password" class="validate">
    <label for="password">Password</label>
  </div>
</div>
Error Messaging
By adding data-error as an attribute and the .invalid class to your <div> and <input> you can add custom messaging to your input field label.

<div class="row">
  <div class="input-field invalid col-4" data-error="wrong">
    <input id="email" type="email" class="invalid">
    <label for="email">Email</label>
  </div>
</div>
Success Messaging
By adding a .valid class to your input field you can highlight the border of the input with green, indicating success.
<div class="row">
  <div class="input-field invalid col-4" data-error="Invalid email">
  <input id="email" type="email" class="invalid">
  <label for="email">Email</label>
  </div>
</div>
Textarea Field
A textarea should be used when there are multiple lines of content that needs to be added. The textarea input height is liquid and will re-size according to the amount of content.

  <div class="row">
    <div class="input-field col-4">
      <textarea id="textarea1" class="materialize-textarea"></textarea>
      <label for="textarea1">Textarea</label>
    </div>
  </div>
Select
Selects allow you to suggest options with one selection allowed.

<div class="select">
    <select class="select-text">
        <option value="" disabled selected>Choose your option</option>
        <option value="1">Option 1</option>
        <option value="2">Option 2</option>
        <option value="3">Option 3</option>
    </select>
    <span class="select-highlight"></span>
    <span class="select-bar"></span>
    <label class="select-label"></label>
</div>
Select Disabled State
Add disabled as an attribute to the <select> element to disable the whole select component.

<div class="select">
    <select class="select-text" disabled>
        <option value="" disabled selected>Choose your option</option>
        <option value="1">Option 1</option>
        <option value="2">Option 2</option>
        <option value="3">Option 3</option>
    </select>
    <span class="select-highlight"></span>
    <span class="select-bar"></span>
    <label class="select-label"></label>
</div>
Radio Buttons
Radio buttons are used when there is a group of options and only one selection is allowed.

<p>
<input name="group1" type="radio" id="option1" />
<label for="option1">Option 1</label>
</p>

<p>
<input name="group1" type="radio" id="option2" />
<label for="option2">Option 2</label>
</p>
Switches
A switch has two states - on and off.

<div class="switch">
  <label>
    <input type="checkbox">
    <span class="lever"></span>
  </label>
</div>
Checkboxes
Checkboxes are used when there is a true or false option. Checkboxes can also be used to select multiple items in a group.

<p>
  <input type="checkbox" id="test1" />
  <label for="test1">Phantom 4</label>
</p>

 <p>
   <input type="checkbox" id="test2" />
   <label for="test2">Inspire 2</label>
</p>

